
Keeping Your Sole on the Straight and Narrow…Mostly
Finding proper shoes for 1830s-1860s costumes is hard, mostly because square toes are completely unfashionable at the moment on anything other than cowboy boots. In addition, ideally, early Victorian shoes should be flat. Heels had been out of vogue since the early 1800s and didn’t full circle back around until the late 1850s. Tiny heels (under 1 inch) can be found on walking shoes and boots, though.
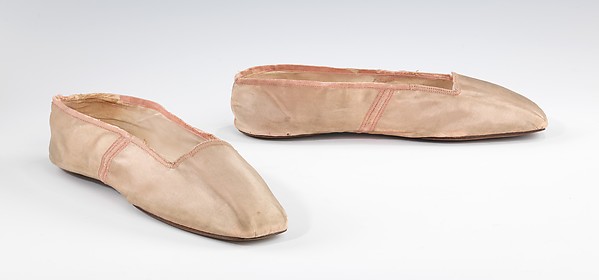
Evening Slippers, circa 1830-45

Leather Slippers, circa 1855-65

Walking boots, circa 1845-65
There are modern square-toed flats available, but the toes always seem to be just a little “off” (usually too chunky) or are way too expensive. Square toes are pretty plentiful on vintage shoes thanks to the 1960s and 1980s, but the square toes are often accompanied by a massive, chunky high heel set at the oddest, most unhistorical angle possible:
Yay! …. NOOOOOOOO!
Since I’ve spent months of thrift shop lurking with no success (everything in the right size is the wrong style and everything the right shape is a size 4!), I’ve been saving up my money for a good pair of mid-century shoes. That’s a far and away dream, so I decided to look into making my own pair of slippers based on the many patterns you can find floating around the web.

Slipper tops like this one were popular housewife handicrafts and were usually embroidered and attached to leather soles to be worn as house slippers for both men and women. They were popular throughout the 19th century and into the early 20th century (this pattern is from 1912). The overall shape changed little throughout the era, mostly because square toes on men’s slippers and shoes stayed in vogue. I’m the worst embroiderer ever, but the shape was simple enough and needed only a sole to go along with it. Victorian shoes are notoriously narrow. Thin, delicate feet were considered the mark of a refined lady. I have a pair of evening boots from around 1840-50 that are only 2.25 inches wide (for comparison, one of my modern flats is 3.5 inches wide).

Since our modern sensibilities drive us to comfortable shoes for everyday wear like sandals and tennis shoes, our feet are much wider than many of our ancestors. I’ve noticed that after I stopped wearing solid dress shoes on a regular basis, my feet spread a bit. Other factors like weight, how much time you spend on your feet, and pregnancy also change how your feet are shaped. Also: genetics. My entire family has large, wide feet.
After a bit of trial and error (and three mock-ups), I’d found a sole shape that was “straight-lasted” and still wide enough that I could just wedge my modern foot into it.

The two pieces are sewn together using tiny 1/8th inch seams.

Lots of extant shoes are made with extra length for a slimming effect, but since my shoes are so soft, any extra length just made the shoe fit sloppily. I used brown cotton duck left over from the Merchant Gentleman’s Coat. It’s stiff, but it stretches– a blessing because it molds quickly to your foot, but a curse because it doesn’t hold the shoe’s shape very well on its own.
I wanted a pair of very basic square toed flats, like these:

Leather Slippers, circa 1850
These were constructed using a two or three piece top rather than a one piece top, but the effect is the same, just with side seams.
For the final shoe, I decided to use a layered approach. I didn’t have leather for the sole, so I used a double layer of duck topped with a “insole” of cotton sheeting. The tops I made from a terrible synthetic fabric that is actually freakishly good at mimicking the look of both leather and silk. The tops are interlined with more cotton duck and then lined with cotton sheeting.

Not bad for a first time sewing together a shoe! I was a terrible person and machine-stitched everything together using a heavy weight quilter’s thread instead of hand sewing, but once everything was patterned and cut, the assembly only took about an hour. I also left the seams inside exposed instead of doing a proper “seamless” lining, but I can always flip the shoes inside out and use bias tape to cover everything if I start feeling ambitious. As they are, though, the seams aren’t much of an issue since I wear stockings with them.

Since I didn’t have leather for soles, these are truly house slippers. They can survive a short jaunt over the pavement, though. The delicately thin slippers of the era were well-known for being too flimsy to withstand more than a few wears anyway, so I’m historically accurate on that count, but so far my slippers seem to be holding up valiantly as I dither around the house in them.

I made the opening a little too rounded. Next time I will make it squared to emphasize the shape of the toe.

I drafted the slippers to be tight at the sides the toe in order to get a flattering shape. Victorian women would have been wearing tight shoes like this since they were young, so their feet would have molded a bit to the shape. Tight shoes got almost as much vitriol flung at them as corsets, but they were necessary to get the proper silhouette.
Everyone always wonders how on earth our ancestors could stand having straight-lasted shoes. We’re used to obvious left/right lasting, but for straight lasted shoes, especially soft slippers like these, wearing them a few times is enough to mold the shoes into a subtle left/right shape. My feet are wide with an distinct left/right shape that quickly left their imprints on my slippers. I wish I had narrower feet so they would look more like the delicate feet of an 1850s Cinderella, but alas! Even making the shoe tight on the sides can only do so much. Because of that, the square toe isn’t as pronounced and ends up looking more like a matador or Chinese slipper than an 1850s lady’s slipper (though I did find this pair that has the same width and shape as mine).
Duck foot strikes again!

The color helps. Even on your feet, black is slimming!
____________
HSF Details
The Challenge: Under $10
Fabric: Cotton duck, cotton sheeting, and synthetic-whatever
Pattern: Self drafted, based on fashion journal patterns from the era
Year: 1840-1860
Notions: Heavy duty quilter’s thread
How historically accurate is it? Hmm…50%? The pattern is spot on as is the fitting method and shape. The soles should be leather, though, and the uppers should be silk, leather, or embroidered.
Hours to complete: 3 hours to gather the gumption and figure out the fitting, and 1 to actually sew the final shoes, so 4 hours total.
First worn: Laundry time!
Total cost: The cotton duck was technically a scrap, but I used about 1/3 yard, so about $2 worth; the cotton sheeting was scraps from lining my 1890s dress, so free; the black synthetic-whatever was $1 yard from Walmart and I used 1/4 yard, so 25 cents; and the most expensive of the bunch was the thread, which was a gift (thanks, mom!), but new would cost about $2.95. Total: $5.20
___________
These were tons of fun to make! Quick and easy with lots of room to experiment and play with materials. The same pattern works for Regency slippers, too. Just make a pointy toe instead of a square one. Butterick makes a historical shoe pattern that has a pair of medieval shoes that can easily be modified if you prefer to work with a pre-made pattern rather than drafting your own from scratch (though, honestly, drafting this pattern is the easiest drafting project you could do). If you can get ahold of leather for soles, they would do very well for ball shoes, but the method will need some changes to account for the leather sole.
Tutorials from Around the Web:

Miss Charlotte’s Shoe Tutorial – The tutorial is for Regency shoes, but the final shape is more 1830s. This is pretty much the method I used for my slippers.

Making Mid 19th Century Shoes – A slide-lacing boot tutorial that has a leather sole and requires no last. Anna’s shoes are almost perfect reproductions and she shows you how to work with the leather soles since they require a few more steps to apply properly.
_________
UPDATE
Here’s a basic sketch of the process:


Those are wonderful! You got the shape down just perfectly, and to be honest, when I saw you finished version, I thought they were originals!
Wowza! That’s quite the compliment! Thank you. :)
Very nice! When I patterned a pair of slippers some time ago I was considering making/trying to make them at some point, and I think you’ve given me the confidence for it.
This has spurred me on to make some slippers. It think I’ve found my inspired by entry. :)
What size shoe do you take normally? I’m a (UK) size 4.
I’m a US 8.5 to 9 D (Wide) or UK 6.5 to 7 D. I have the smallest feet in my family! :)
These charts are for berlin woolwork / needlepoint a simple craft you can easily do with wool or floss. You can have your dream shoes or slippers at little cost.
Wow you’r a genius! Do you happen to have the pattern that you could post?
I do not, aside from the graphic at the end of the post. I just traced my foot and drew the slipper top shape over it to match.
This is a link to 1857 Germany. 2 baby shoe patterns I enlarged the pattern (full page to 190% and it fit perfectly size us 9 -9.5 ) the instructions are in German I translated to figure out they are baby shoes lol but I don’t care. its just for fun anyway.
http://digital.ub.uni-duesseldorf.de/ihd/periodical/pageview/2965476