NOTE: An earlier version of this post was originally written for Margo’s Patreon page in 2021. She recently announced that she will be discontinuing her pre-printed pattern service. This waistcoat/jacket pattern will remain available as a digital download (026D), but the paper pattern version will be retired when the current batch sells out.
I have always coveted an early 17th century waistcoat ever since I first discovered them a decade ago. I loved how “frumpy-chic” they were: comfy loungewear that was often completely over-the-top with polychrome embroidery, lace, and spangles.
I even hacked a thrift-shopped modern jacket into a facsimile of a Elizabethan/Jacobean waistcoat in 2013, with surprisingly good results considering I just basted up the side seams with giant backstitches—not out of a love of historical accuracy (clearly, considering I kept the original zipper front of the jacket which also happened to be made of a spandex/rayon blend), but out of pure adoration for The Look.
Also pictured: The Walmart eyelet lace ruff I made by gluing the folds like a book with Tacky Glue and the coif made from a recycled shirt.Sorry for the gaps in many of my old posts. Links and photos have changed/moved/been deleted over the years and I hadn’t yet learned hotlinking was considered rude…
I vowed to eventually do the fashion true justice and make a proper version, but I never seemed to get around to it.
You can imagine, then, my elation when Margo Anderson asked if I would be interested in pattern testing the new Elizabethan Waistcoat pattern. What excitement! I was thoroughly gobsmacked. Here was I, long dreaming of making another jacket of this very sort and here was the perfect opportunity!
Pattern testing is a curious business. I had no idea what to expect! Margo provided the rough draft of the pattern pieces and manual. The draft wasn’t complete since it was still in production—we were pattern testing for that very reason, after all—but it already had illustrations for the majority of the steps, so I could guess what needed to be done by looking at the pieces and illustrations.
I have gained a bit more sewing and construction knowledge since my first baste-a-modern-stretch-jacket attempt, though only a smidgen more patience. However, my need for swift gratification was well-served and I found Margo’s waistcoat quite quick and enjoyable to construct. If I– an admittedly haphazard seamstress– can do it, I have confidence that anyone with a firm grasp of basic sewing techniques and a bit of ambition could make this pattern work. If you’ve ever made a Victorian bodice, 18th century bodice, or even a modern structured top, you would probably be comfortable making this pattern.
Pattern 024 contains different construction options like two sleeve choices (a two-piece slim/fitted sleeve or a one-piece full sleeve), high or low collar, and two different hip flare options (inserted gussets or a separate peplum).
I was asked to test out the separate peplum option which suited me very well since it eliminated the need to fiddle with inserting gussets. Margo, does, however, provide a clever method for doing so, should I opt to try tackling another version of the pattern in the future.
My measurements at the time.
I had no prior experience with Margo’s fitting system and feared that I might have some difficulty fairly testing the pattern since I normally have to perform quite a few major alterations to fit my large bust, short waist, and wide shoulders. As recommended, I followed her meticulous fitting guide, taking a multitude of measurements and filling in the appropriate boxes on the sizing chart. At first, I was anxious—my measurements were literally all over the chart! However, I trusted her system and cut out my mockup following Margo’s method.
To my absolute delight, with just a few minor tweaks, it worked!
I got an excellent fit pretty much straight away. The only alteration I had to do was a 1 inch Full Bust Adjustment (FBA)—considerably less than I normally have to do! Because of this, I was able to re-cut the front panels only and complete a wearable mockup of the pattern in a single weekend.
Additionally, because I did the peplum version, I was able to sew nearly everything by machine! While not historically accurate in the least, being able to sew the majority by machine means that folks like me who are impatient, messy hand-sewers, or needing to make it quickly can do so with little issue.
By far my favorite part of sewing Margo’s waistcoat pattern was the incredible sleeves! I absolutely adore full, fanciful sleeves! These are not only beautifully shaped and perfectly tapered (which is harder to achieve than you might think), they are easy to set and only one piece! Plus, as she pointed out, they offer an incredible full range of motion.
You can pick apples, bend down to tie your shoes, raise your hands fix your hat, stretch your arms out to the steering wheel over 4 layers of 4 yard petticoats, and, if anyone quips about “A lady never had to raise her arms,” you can whirligig at them in a righteous rage with ease.
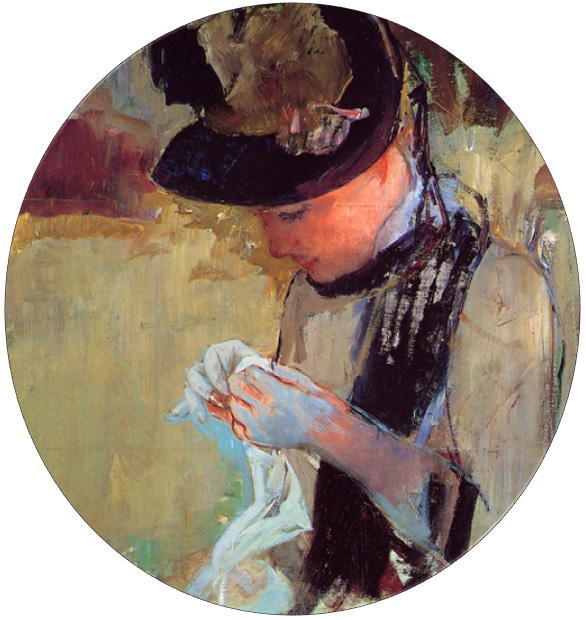
My jacket is made from a lighter-weight cotton duck printed with bees. It’s lined with an old curtain/sheet/something scrap. It is not interlined or boned in any way. I did opt to wear mine over a corset, but that’s personal preference. These sorts of garments would have been worn over stays or over just a shift to relax at home. To gussie it up a bit, I made some bows out of poly-satin ribbon and blinged them with some rhinestones rescued from an old sweater.
Elizabethan and Jacobean jackets can close with actual ribbon ties, but I am horrible at tying bows, so I opted to close my jacket by pinning my pre-sewn bows on instead. Hooks and eyes would also be period-appropriate. I also pieced together a collar and cuffs from a thrifted silk shirt and Walmart lace.
I made up a “pattern” for my collar by heedlessly hacking up the fabric until it fit the neckline that way I wanted. If you’d like a smarter approach, try one of the many free detachable collar patterns out there, like this one that’s a similar shape.
I am not a perfect seamstress by any stretch, but I was still able to create a lovely, comfortable garment I can be proud of, and it was just a first-try mockup! Margo has since updated, refined, and published the completed pattern and manual on her website and other folks have made awesome waistcoats of their own from it. Many thanks to Margo for affording me the opportunity to test her waistcoat pattern! You can visit Margo’s shop here.
WARNING: This post rambles more than the Allman Brothers. Pour yourself a tasty drink and settle in. I recommend mint tea.
It’s been YEARS since I’ve posted here regularly (almost 2 years to the day, in fact). I’m going to try giving ye olde blogging routine another try, even if just for the sake of my vanity!
Vanity…and sanity! It is really hard to get motivated to sew with no events to go to, so maybe getting back into a semi-regular blogging cycle will give my sewing mojo some oomph until I rustle up some events to crash.
A lot has changed since I’ve been active on WordPress regularly. Heck, I don’t even know the interface anymore: everything on the admin side of things has changed, especially the way you type up and add pictures to posts. If there’s wonky formatting, I do apologize. Like, seriously, why is all my text centered on the author side, yet half is right-aligned in the reader side?! Lame. Guess my blog posts may match my haphazard sewing style for a while!
I completed a few projects between 2020 and now– three of which were pattern tests for Margo Anderson’s ever-growing line of Renaissance and Stuart-era patterns. I didn’t post about them at the time because the patterns were still in the testing phase, but now that they’ve been released and I’ve gotten permission to post here about them, I will post the write-ups about them the next couple weeks!
The Magical Mylar 1490s Gamurra, Jaco”bee'”an Jacket, and Juliet Cap
After sharing pictures with my fam, my mom– who is a first-class reader and Charles Dickens nerd– expressed interest in attending Dickens fair in the future. Well, we all know what happened in the intervening years, so let’s skip forward in time to last year, 2022…
Finally, Dickens was on the table once again! Now, I knew about this plan well in advance. My parents and I had talked through it since the start of the year, reserved the house for it over the summer, the works. My mom even decided that instead of wearing her first brown and teal 1840s version of Simplicity 3723 (which you can read her pattern review of here), she was going to sew an entirely new dress in a more festive plaid!
Her first historical costume! It’s never too late to start playing dress-up!
She wanted a more mid-century silhouette, so she used Simplicity 3723‘s “Colonial-style” sleeve pattern and the undersleeves from Simplicity 2887 to create fashionable 1850s pagoda sleeves.
1850s Plaid Silk Dress with Tiered Pagoda Sleeves
My mom is a careful planner; thus, she started her dress well in advance of the event so she would have plenty of time to make the changes she wanted properly–carefully fitting her bodice and hand-hemming her skirt. And it worked beautifully!
My mom’s dress is made from unlined plaid homespun cotton and she opted not to wear a corset. It was very warm during Dickens on the Strand this year, so it was more comfortable for her. My dad is wearing the Callahan Frock Coat from Historical Emporium, a top hat from Hats in the Belfry, ascot tie from Amazon, a thirfted vest, and wool pants. He crafted his own walking stick from a broom handle and a fancy cut-crystal drawer pull.
I did not inherit the same methodical, preemptive-planning prowess as my mother, so I did not start sewing until October, and even then, did I sew for myself? Heck no! I sewed a waistcoat for my husband instead, complete with wildly frustrating welt pockets. I got too cocky after perfectly sewing the first one, only to royally bungle the second one and had to piece over the blunder with scraps.
Shhhhh! He never needs to know!
Chris is a large man. He’s over 6 feet tall and has a 54 inch chest. I used McCalls 8133 and had to enlarge the pattern to fit by performing a Full Belly Adjustment, adding 3 inches of length, and by adding 1 inch panels down the sides to let it out/in as needed. I omitted the back belt and darts because he preferred a looser fit at the bottom, but if you are fitting over a large belly and don’t like the “tenting” flare that sometimes happens on the bottom of vests at the bottom, a few small darts can nip in the excess fabric to get the smoother fit you see in older portraits. Performing a Full Belly Adjustment also curves the front edge, which helps accommodate the round of a protruding belly.
I used some fabulous reproduction quilting cotton I got from Thousands of Bolts for under $6 a yard few few years ago– and this vest only took 2 yards even with the sizing-up! The buttons are large 1″ antique mother-of-pearl from the early 19th century. I added an extra button (totaling 5). Buttons are one of those things that it’s better to figure out on the body than relying on pattern markings. Sometimes you need more, sometimes you need less.
When I looked up from my madly whirring sewing machine at the haphazardly-hung space cat calendar on the wall, I was gobsmacked to discover it was the dawn of November…and I had only three weeks to sew my entire Dickens outfit!
Now I may not have inherited my parents’ ability to start anything on time, but they did teach me some handy math skills. I calculated that if I dedicated all my free time in November to sewing (~5 hours), I would have 140 hours to get an outfit done.
Please don’t look at the notation too closely! The only BS I have is the sort you can be full of.
Now, depending on how long you’ve been lurking on this blog, you may recall how many times I’ve LITERALLY WAITED UNTIL THE NIGHT BEFORE to whip something up in an avalanche of insomnia-fueled madness. 140 hours? That’s basically an eternity, right? But that was before I had a full time job and had outgrown all my sloper patterns with the Covid 19lbs (more like 30lbs). Nothing fit! None of my old dresses, none of my favorite patterns, none of my old Easy Edwardian bin stand-bys. Even my 1840s dress from 2020 and my newest my Lavender Edwardian dress from 2021 fits me anymore.
I am devastated I don’t fit in this right now! I only got to wear it once for a few pictures in the park. I may have to do a brief write-up about this outfit just so I can tell the tale of how I decided stretchy spandex lace was absolutely the perfect material to make a historical costume out of…
I was absolutely dreading starting entirely from scratch. But my closet–a cobwebby crevasse filled with the darkness of disappointment– yielded up one ray of hope. There was one dress that fit because I had accidentally made it too large to begin with: my 1870s Sally Dress from Halloween of 2021.
The dress is a Natural Form spin on Sally’s outfit from the Nightmare Before Christmas. I wore it in 2021 as Sally and again as a cottagecore kitchen witch in 2022, so I knew it still fit, and more properly than when it was first made…finally a dress that I grew into rather than out of! I considered wearing it (it’s Christmas themed, right?), but the overall air of this Dickens trip was more historically accurate-ish, so I refrained!
For years I have been tracing my fitted mock-ups onto Christmas wrapping paper from the Dollar Tree and hording the mounds of curled, scribbled-on pattern pieces in a tottery set of plastic drawers. Now my labor of paper hoarding had come to fruition! I dug through my drawers and found Sally’s original paper patterns and, since I knew it (mostly) fit, I had a base to build on. Like the beloved character herself, Sally’s dress was a mashup of patterns including Simplicity 3723, Butterick 6400, an old duct-tape dummy, Butterick 6093, and a lot of slap-dashery. It’s a gloriously terrible hot mess– which is why it didn’t really neatly fit when I made it originally. But it was a start! Gathering all my odd-ends and bowl of pins, it was time to drag myself weepy-eyed to the top of the project and and just yeet myself in.
Behold, my Fast (food) 1870s Skirt pattern! It is made using the skirt back pattern piece from Butterick 6093– yes, the 1910s pattern that is now sadly out of print. If you own it, you can easily make it yourself! Add 4 inches of width at the center back (to accommodate pleating over a small bum pad) then measure to just above your knee and add a rectangle “step” between 8 and 12 inches wide (depending on how full you want the flare) to form an L shape. The L shape is pleated, forming a fanned hem that trails enough for that delightful Natural Form languidly, but not enough that you’ll get stepped on constantly. Similar in shape to this 1877 petticoat.
I didn’t have the time to spare for fabric shopping. This was a good thing, really. Let’s face it, if you sew at all, you likely have closets/tubs/storage units full of hoarded fabric you bought before the attempted resurrection of the gastric-brooding frog (or perhaps your stash was born long before it went extinct in the first place). Way back in the early days of this blog, while scientists were attempting amphibian de-extinction, I was in Carlsbad New Mexico shopping for fabric in the dingy back corner of Walmart. I found a wild feathery quilting cotton in the value section next to a teal polycotton that sort of coordinated.
Ah, the halcyon days of $1-$2/yard mystery fabrics!
I bought the the entire bolt of each with the intention of sewing a bustle dress out of them, but I had no confidence to attempt it at the time. The pair languished for nearly a decade until panic and desperation swung the spotlight in their direction. They were perfect! In fact, I had fallen in love with a dress from Augusta Auctions that had similar vibes.
I vowed to myself that I would make this entire project– from fabric to thread to buttons to trim– 100% from my stash.
Oh, the hubris!
You may have noticed my preliminary design sketches in the pic of my cheap-o fabrics. You can also see my original intention to try Simplicity’s steampunk pattern, 2172. The top isn’t one piece, though. It’s a bustier with a jacket, which wasn’t the level of historical I was looking for in this project. Instead, I chose a different brand of Suffering™. I decided that I was going to make a faux jacket front in every wrong way possible and waste yards of my precious fashion fabric to do so.
I waffled over the color because I had this awesome red that made the feathery fabric pop, but I felt bad home-wrecking the decade long Teal/Feathers marriage, so I opted to stick with the original match-up, especially since the inspo dress was the same color.
In the past, I had padded out my basic dressform with an old bra and some pantyhose filled with beans (a la American Duchess) to match my inverted triangle shape. But the padding was no longer adequate for my new shape, making design choices difficult since the bodice just hung limply on it. So as a joke, I turned my ancient hip pads into boobs. I had a conniption when I discovered they were the perfect size! The t-shirt cover tamed the perky polyfill pillows into a much more accurate silhouette.
I’m going to be honest, I don’t remember what exactly I did at each step. There was a metric heck-ton of floundering and false-starts that ate shark-worthy bites out of my 140 hour math pie. I do know I created a full flat-lining of cotton partially covered with the feathery fabric overlaid with the teal (originally supposed to be a free-floating over piece that I then had to applique down). The lapels are appliqued on by hand as well, snapping shut at the front to hide where I cut the neckline of the teal an inch too low on one side.
Shhhhhhh! No one except you, me, and the entire internet ever need to know!
Considering the number of weird sewing choices I’ve seen in the extant Victorian bodices I own, I’m going to take comfort knowing that the glory of the bustle period is that if you make a mistake, you can cover it in trim– by carefully cutting some dumpster-dived navy velveteen into a 10 yard long strip 1″ wide, followed by tediously peeling threads off the jagged edges so they wouldn’t fray.
(Pic 1) Aforementioned velvet strips to cover the bottom edge of the bodice. (Pic 2) PRO COUTURE FINISHING TIP: Use a color-matching Sharpie to hide the white lining that pokes through your machine-made button holes . Seriously. It worked magic. (Pic 3) I also only used stash thread. I exhausted three whole spools plus partials of other. There’s about a half mile of thread in this dress! (Pic 4) Cuffs are just trapezoids the size of my wrist on the smaller edge.
I also decided that the origami pleated hem absolutely needed tassels (since I couldn’t get the fabulous ball fringe of the original inspo dress), so I made them by using some leftover Sally dress dye to turn the also-leftover embroidery thread hanks navy. It’s delciously easy to make tassels! There’s tons of tutorials online, but you can click here to visit a tutorial similar to the method I used.
You see, I have a not-so-small collection of trims in my stash, but absolutely nothing in teal, red, or navy! I did have some smashing mustard picot ribbon I wanted to use for a collar bow, but as the dress progressed, it was just didn’t jive. Yet, without it, the neckline looked really barren.
One of the tricks I have learned over the years is that cuffs and collars are the two places that can really make or break the “authenticity” of a historical costume. In the past folks often had detachable cuffs and collars for all their formal outfits and the farther back in time you go, the more important these accessories were. Victorian magazines are brimming with cuff and collar patterns for a reason! These accessories have largely been lost to us in modern fashion for decades now and we’re not used to using them anymore. However, I love that current fashion trends have kind of revived the collar/dickie! If you’re looking to level up your basic costumes a bit, a cheap lace dickie from the ‘Mazon or eBay can really work wonders. For an example, here’s my plain green Butterick 6093 dress when I first made it compared to after adding some lace cuffs (hacked from an old blouse) and wearing a stretch lace tanktop underneath:
In the case of my Dickens dress, I had some scraps of vintage lace that worked miracles to make the outfit look much more finished…just in time, in fact! I finished my dress just in time on the evening of November 30th– hardly more than 24 hours before we were supposed to leave! Whew!
Don’t let my unambiguously enthusiastic expression fool you: I was in a pure fugue state. I literally don’t remember half of those last two weeks.
Jokes aside, I was incredibly exhausted, but proud of myself for pulling together such a huge project– the first of its size and complexity I’d made in many, many years! It was definitely a challenge trying to revive rusty skills and overcome the material limitations I put on myself, yet even with all of the flailing, fumbles, and foibles, this is one of the most Historically Accurate™ outfits I’ve made, especially in the overall final look of it. It’s unambiguously “VICTORIAN!” from its over-complex layering to its fancy-but-functionless buckle and excessive trims. Even the feathery cotton, which looked more 1980s than 19th century on the bolt, plays into that Victorian taste in experimental fabric (even if it should be silk and wool rather than cotton and poly blends).
So, overall, outgrowing my entire wardrobe may be immensely sad, but it did have a positive outcome: 1. I was spurred to action for the first time in a long time 2. I had to get extra creative to work within my material and time constraints (self-imposed as they were) 3. I ended up with an outfit rather than a costume, a design that I feel is very close to what a “Victorian Me” would have worn in the time period.
Bonus: One of my old dresses did get to escape the dark recesses of my closet and let them go for a promenade once more! After I performed some intensive rehab on the hem pleats, my sister borrowed my favorite old outfit: my beloved yellow plaid Croissant Dress!
Much like my first trip to Dickens on the Strand in 2018, it was forecast to be suitably English weather, chilly and foggy, but it was a bare, baldfaced LIE! It was, indeed, quite foggy for a good portion of it, but it was quite warm and sticky. Why does this always happen?! Oh, right. Texas. Despite the sweat soaking my petticoats, the dolphins were out on the pier during Tea with the Captain’s Wife, we got to people-watch, received lots of compliments from happy passersby, enjoyed the museums, and wandered the grey beach. I didn’t get a ton of pics since we were incredibly busy the whole time, but here are a few:
Thank you for reading this protracted post! This dress has still yet more fun stuff for me to write about, like the origami hem pleats and how to make a very simple bustle overskirt. Hopefully since I’ve promised to write some some posts (Margo Pattern posts, Sally post, Lavender Dress post, origami hem post, overskirt post), I’ll be able to use these older projects to fill the time between now and the completion of the next project.


