I hardly got to attend any events this year since work is short-staffed and work weekends always seemed to fall on guild days. I am so thankful to Carol for covering for me so I could attend my favorite event: Georgian Picnic! It was the first event I ever attended with the DFW costumers Guild and it is still my favorite. It’s laid back and relaxing.
The costuming chaos leading up to it, however, is a different story. This year, as every year, was fraught with last-minute perils. On my plate this year was the ever-variable Texas weather (will it be 85° or 58°?), a new Regency tailcoat (remember how well that went last time?), and a Normandy Bonnet (Wha—???).
After the disappointment of making a costume last year for a friend only to have it languish when she was unable to attend, I was wary making costumes for anyone other than Chris and I. But while I was able to escape work on the 19th, he was not so lucky. So I laid aside my fear of rejection and asked our friend Wix to go with me. Wix had never worn a historical costume before, but was interested in sewing and was willing to go through multiple fittings. Regency menswear struck their fancy, so we settled on a tailcoat made from Butterick 3648:


Butterick 3648 used to be out of print, but is now available through McCall’s Cosplay website in the “Vault Collection” as M2021. I used the old Butterick version I purchased off of eBay. I didn’t use the trouser pattern, but the coat pattern was very easy to use, if a bit complex. Bag lining is always a bear! I just can’t wrap my head around the pseudo-topology of it sometimes, but I worked it out. I actually got the inside fairly neat and tidy! It’s a miracle! The jacket pattern itself is quite handsome, and I highly recommend it. Depending on the fabric choices and styling tweaks you make, it can work for 1970s to 1830s. Here are some of my inspiration images:

“Portrait of Nicolas-Pierre Tiolier” by French painter François-Édouard Picot, 1817

Men’s ensemble with piqué vest and nankeen pantaloons, 1813
This is one of my favorite Regency outfits ever.

Fashion plate, 1813

Fashion Plate, circa 1802
And here’s the final result:

Photo Courtesy of Festive Attyre
This pattern has a waist seam (not usually found before about 1820 for those concerned with HA) and uses modern techniques to put together–a boon since tailoring is not a skill I possess! I used the size XS for the jacket to get a close fit and it was still a little large even after alterations. I treated the coat as a Victorian bodice rather than a suit jacket for fitting. I learned a handy new alteration, too: forward-sloping shoulder. It is the total opposite of HA (most period coats have shoulder seams over the back of the shoulder, not at the top and definitely not in the front), but the fit and comfort level improved 100% with just that one change. Modern folks just sit more, leading to forward-leaning shoulders. If you struggle with shoulder fitting, this might solve a lot of heartache!

You can’t see it in this picture, but I also raised the armpit, lengthened the sleeve and reduced the sleeve cap to increase movement. Modern suits have a very sharp sleeve drop-off whereas Regency coats have a more sloping line. The forward-shoulder adjustment was significant, almost an inch!
Since the last few picnics were on the cold side, we decided on a soft, warm cotton flannel in a light slate blue. Cotton flannel is great stuff to sew with, it’s fairly cheap, and it’s easy to find, making it a great option for outerwear if you can’t find/afford wool!
With the addition of some vintage pants, white shirt, gauzy scarf, and a trinket-filled fob, Wix was transformed into a Regency gentleman!


Overall, the pattern was a good one, but there were two things I didn’t like. First was the bag lining. This is a personal hangup. I hate slogging through the method even if the results are nice. Trying to line the edges up and sew them crisply was a PITA! The little turn where the standing collar and revers/lapels meet turned out so wrinkled because the many think layers all bunch there despite trimming and notching the seam allowance. This is mostly on me, though. Like a always say, my sewing skills are harried at best, vicious at worst, so it’s no fault of the pattern, just a technique I don’t like/am not used to. The second problem, though, was the pattern’s use of iron-on interfacing for the jacket front. Many good, experienced seamstresses and tailors swear by interfacing to give a nice smooth, full appearance. The period correct method of interfacing/interlining is to pad stitch in horsehair canvas. Since this pattern is designed with modern techniques, the instructions recommend iron-on interfacing to make the front of the jacket, its collar, and revers lay smoothly. I’d never used iron-on interfacing before…NEVER AGAIN.

IT LOOKED AND FELT SO BAD YOU GUYS. Like, maybe I chose the wrong type or weight or whatever, but…NO! It felt like damp paper towel and made the front of the coat look like it was made of craft foam. Thank heavens I had double the amount of the flannel yardage in my stash, otherwise I would have been in a world of hurt. So I had to re-cut and re-sew the entire front of the coat, but this time I used some vintage linen my Nana had given me. It wasn’t nearly as stiff as horsehair would be, but it got the job done and is still soft, more HA, and didn’t make Wix feel like they were being suffocated in a kitchen trash bag.

You can see that the linen give the revers some oomph.
When given the choice between fabric-covered and metal buttons, Wix chose my favorite brass button from Walmart to give their coat some flash. They are the same type of button I used on my merchant gentleman’s coat. They are cheap and fabulous—I highly recommend them! Plus, they mimic the look of new gilt buttons from the era. Just a few weeks ago I found some original buttons at a local antique store. The Walmart ones are much lighter weight and way shinier, but look at how similar they are:

Guess which ones are are the Whal-mert buttons!
…yeah, the ones on the right.
They’re not perfect dupes, but for their look and price-point, you can’t beat ’em!
The waistcoat I improvised from the coat pattern by omitting the tails, standing collar (though early Regency waistcoats had standing collars, too), and sleeves and cutting the back as one piece. The striped fabric is way too precious to use my usual slap-dash sewing methods. I’d never made a properly lined vest before, but it was waaaaay weirder than I had anticipated, yet with lots of help of Google and some awesome bloggers who took really helpful pictures, I succeeded.

The vest has small white plastic buttons down the front because I didn’t have enough vintage mother of pearl buttons that match. I was so proud of myself: I finally gathered the gumption to use the buttonhole function on my machine to spare myself the embarrassment of making hideous hand-sewn buttonholes! Though now, I wonder if that contributed to the death of my sewing machine….
Yes. That happened, too.

On Thursday, my Singer Simple ground to a halt. Despite all my best efforts oiling, faithfully de-linting, and changing needles, wrenching the flywheel forward felt like it is full of gravel, it sounded like death, and it would only sew at top speed, whumping like a thrash metal drumline with each stitch. And yes, I did try all the usual fixes. I took out the bobbin apparatus. I oiled every bit that could conceivably need oil. I took off the plastic cover and checked every part I could access. I am no sewing machine expert and while I was upset since the machine was a gift from my parents, I had no time to get it serviced before the event and it was more cost effective to buy a new machine. So I did.
I will confess that–and it’s a bit silly, I know– when I brought the new machine into the house, I made sure to box up the old machine and lay it quietly in the downstairs closet before I even took the new machine upstairs because–yes, it’s so ridiculous, but I didn’t want to hurt the old machine’s feelings….ya know? The last thing I need is the ghost of Sewing Machine Past haunting me in the middle of the night as I tossed and turned in my bed, tormented by a guilty conscious and the sound of grinding flywheels.

When I typed in “haunted sewing machine” into Google, this was one of the first results. Pearls Before Swine never fails me….unlike a certain sewing mach—nooooooooooo! It’s coming for meeeeeee!
Jokes aside, it was pretty emotionally traumatic and incredibly frustrating since it was so close to the deadline. It actually wasn’t actually the buttonholes that did it. My machine continued to sew well until I had finished my bonnet and started my dress mockup. There’s just something out of plumb in a place I can’t reach.
As soon as the new machine had ascended the throne, I launched right back into sewing. I’d been far too unproductive this year and I felt the burning need to finish something. One too many bowls of mac n cheese had piled up on my hips, so nothing fit anymore, so I had to sew or go plain-clothes! NOOOOOOO!
By slicing and dicing my old version of sliced-and-diced Simplicity 4055, I made a bodice that fit well enough to be wearable:

That top left photo shows this alteration in progress. I also performed a FBA and changed the gown from a back closure to a front closure and only inserted a drawstring in the front instead of all the way around.
This was not Pragmatic, guys. I will be the first to admit it. It’s a ton of work to size up a pattern that much! It’s great alteration practice, though, so there is a bright side. For example, this pattern will now fit between a 40 and 46 inch bust, so even if current weight trends continue, this pattern will still fit for a while.
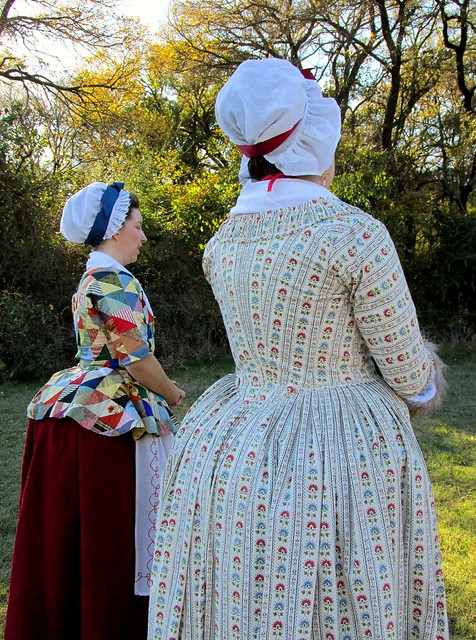
Speaking of bright sides, I used a possibly-poly-linen-blend from the Walmart value fabric section in yolk yellow for the fabric. Simplicity 4055 is a great pattern, but the sleeves can be obnoxious. The illustration and notches are kind of confusing. We’re so used to putting the sleeve seam at the back of the dress and the illustration appears to show that set-up, but when you set the sleeves that way this happens:

The top photo shows the angled wrinkles as the sleeve fullness bunches at the front of the shoulder and you cannot reach forward. When I lift my arm backwards, the wrinkles follow the movement naturally. As I discovered in my previous striped version, the seam goes in the front, quite high up, too! Then you have a nice, full range of motion.
I also made an apron from a sheet, but I didn’t take any pictures. I just freehanded a top shape and used the front overskirt panel from Simplicity 4055 as a guide. I cheated and used the pre-hemmed edge of the sheet–one less thing to hem!

Photo courtesy of Festive Attyre
As garish as the ketchup and mustard combo is, the dress and apron are not the stars of the show, though. That honor might go to my bonnet:
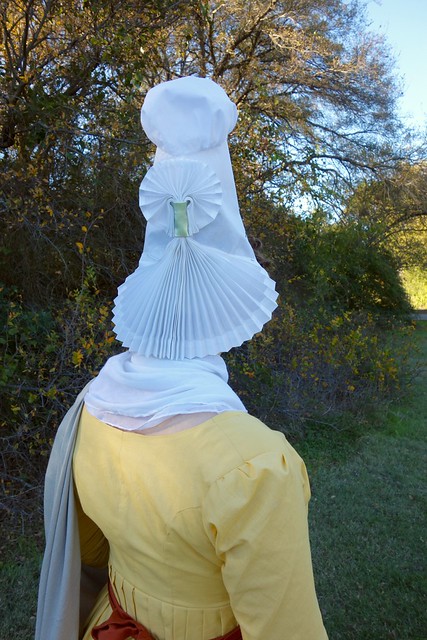
Photo courtesy of Festive Attyre
It’s certainly not your average regency coif! Indeed, this isn’t like any Regency bonnet I’d ever seen before. (While Chris was helping me take pictures of my pattern draft, he asked me why I was making a chef hat out of coffee filters). It’s quite a statement! So why did I choose this peculiar bonnet instead of, say, a classic turban or pokebonnet?
Depending on how much you’ve read on my blog, you may remember this particular Find of the Month:

You can read all about it here, but the TL:DR version is that I bought this early 19th century Saint Lo paste cross on eBay. Much like my weird concern for my sewing machine’s feelings, one of my lovable eccentricities is the warm fuzzy feeling I get when I “reunite” something old with the fashions of it’s youth, for example, wearing an 1890s jacket in a Victorian house or pairing an 1850s book with a crinoline dress. I like to imagine their surprise at seeing something from their distant past after decades of watching modernity grow up around them. This battered old pendant has a particularly soft place in my heart. It’s not as eye-catching as my bonnet, but this is the true star of the show. It deserved to worn in the sunshine on a velvet ribbon once again! But what would it have been worn with?
I set about researching the costumes of Saint Lo in Marche in the Western part of Normandy, France, not expecting to find much about something so particular and obscure. You think I would have learned by now that if you ask the right questions long enough, the internet is full of surprising answers:
There are two other images as well, but I do not have a license to post them directly. :(
One is here.
The other, which is my primary inspiration image, is here.
I never in my wildest dreams thought that’d I’d find one, much less three, original engravings of the traditional costume of Saint Lo and from the exact period my pendant was made! What an amazing time we live in!
The book they came from is “Costumes de femmes du pays de Caux, et de plusieurs autres parties de l’ancienne province de Normandie” by Louis-Marie Lante and Pierre de La Mésangère with engravings by Georges Jacques Gatine, first published in 1827. The book is full of full color engravings of the local costumes of the cities, villages,a and countryside in Normandy. There is even a digitized version from the New York Library you can see online! Sadly, not all of the plates were scanned in color and it seems to be missing some (and there a few doubles) so it may be an incomplete copy or some plates came out in a different edition.
Looking through the photos, I noticed that throughout the region there were lots of bright colors, pinned on aprons, and fichus/neckerchiefs/shawls. Oh, and bonnets!

The shape of my bonnet ended up being a cross between Saint Lo and Lisieux.
Normandy is famous for its traditional costumes, especially extravagant bonnets/coifs/caps! The caps styles vary greatly from town to town, family to family, and woman to woman, but they are generally lacy and full or tall and frilled…sometimes both! I couldn’t find a pattern online, especially on my short deadline, and my drafting skills are rudimentary at best. So as much as I’d like to make an exact replica, I decided it’d be best to design my own take on a Normandy bonnet. I took the main elements of the Saint Lo Bonnet and broke it down into components:

Tall body, accordion pleated frill, and puffed top.
I used Swedish sewing paper Becky had given me to draft the bonnet. It’s non-woven and stiff enough to stand on its own. A fabric bonnet would be more work to get it to look right. First, I needed a fabric that was thin, lightweight, but strong. Organdy would be a good choice, but I already had this sheer white cotton shirt from Goodwill on hand:


After cutting and assembling the main part of the cap, I starched it…A LOT. I used this recipe, but dunked the cap and un-pleated frill instead of spritzing them. To help hold the shape when it was drying, I made this highly professional hat block:

Worked great, except the starchy water dissolved some of the paint, so the inside of my cap faintly reads “Taco Casa.”
The back frill was done in accordion pleats. Accordion pleats are tedious to iron, lemme tell you! This book has a great description of the process. Without a pleater board, you can’t get pleats much smaller than 1/2″ or so. One source even said that accordion pleats are best left to professionals only! You know how well that sort of challenge goes in my craft room.

Accordion pleats stack up just like a handfan, so you are ironing on a tall, thin edge. I ended up having to pleat one half of the frill and then pleat the other half, meeting as close to the middle as possible, otherwise, it became too tall to iron! To keep the halves together as the pleats set, I whips stitched them. Heavily starching the fabric helped immesly because it gave the fabric the texture of paper, so it was similar to working with construction paper.

The fanned frill is a separate piece that I basted on to the back of the cap. The tips of the frill are held open using small straight pins (which I had to do without the benefit of a mirror at the picnic. The bonnet is too tall to wear in the car!).

The day of the picnic had just enough wind that I needed two bobby pins to secure it in front since it’s so tall and wide it acts like a sail!
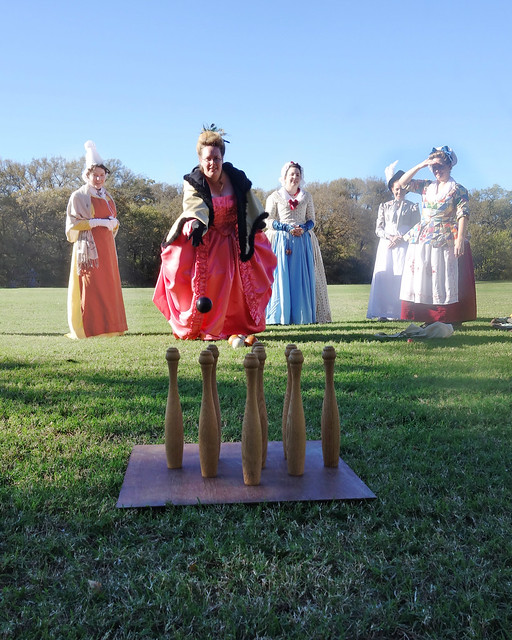
Overall, the picnic was a success! We played a skittles/tenpins, took a few turns trying out the bandelore (yo-yo), and generally enjoyed the refreshing autumn air.

Wix pointed out that we were Disney Princess colors!


I’m looking forward to next year!
Find more photos on Festive Attyre’s (Jen Thompson) Flickr Album:
And on my meager Flickr page: