
One Pattern to rule them all; One Pattern to make them; One Girl to sew them, and with some changes, fake them!
Bustle Dress circa 1886
Ah, Simplicity 3723! I am not afraid to admit it: I have a not-so-secret love affair with 3723. It’s the catch-all pattern designed to make basic “Pilgrim, “Colonial,” and “Prairie” style dresses using as few pattern pieces as possible. None of them are historically accurate by any means, but the shapes and styles are very easy to manipulate even for someone as ham-handed as myself.

Simplicity patterns get very little love in the historical costuming community, which is a shame. They may not be historically accurate, but they are readily available and in the case of Simplicity 3723, supremely modifiable– great for fitting practice and flexing your creative muscles! You can literally make a dress from almost any era with just this one pattern and plenty of chutzpah. One of my previous costuming projects involved transforming Simplicity 3723 into something a little more historically accurate for the 18th century:

My 18th century Lady’s Maid Dress
It’s the heat of the summer again and I felt like I needed another Simplicity 3723 project (maybe it’ll become a summer tradition, who knows?). I’m more penniless than ever before, so I had an extra level of frugality to wrestle with, but I was feeling ambitious. I needed a bustle gown and I figured I could whip one up in a jiffy if I played around with the pattern pieces a bit, and by golly, I was right! With a few tweaks, I was about to create a fairly decent bustle silhouette!
Sadly, in my haste, I neglected to add extra width to the shoulders, so I didn’t fit into the dress at all. A lovely lady in Germany offered to give it another chance, so off went Bustle Dress #1 to a new home! After a good cry and a few months/projects later, I was ready to try again. This time I made sure that I fitted the shoulders properly! That’s one of the glories of this pattern: the pieces are very simple to alter.

When I finally get all the alterations right, I trace my new pattern onto interfacing (the sew-in kind, not the iron-on). It’s strong, durable, won’t unravel and is hard to tear. Label the new pattern with the original pattern and piece number, any sewing marks, and what alterations you made. Adding a date created and/or the measurements is also helpful. Bodies tend to change over time!
Luckily, I had bought the whole bolt of faux suiting and found some more green velour at Walmart, so I could stick to my original design and stay within budget. Huzzah!
The Design
Simplicity 3723 doesn’t have a “bustle” option. Indeed, it’s well nigh impossible to find a decent all-in-one bustle dress pattern from the Big 3, mostly because bustle dresses are often large swathes of fabric carefully caught up into shape using tapes, gathers, drapes, and a strategically placed gore or three. All these large tissue pieces mean that a full bustle dress pattern is very bulky and hard to fit into a regulation Big 3 envelope. However, by choosing the right pieces and fudging them a bit, you can make View A (the “Prairie” style dress) into a fairly nice bustle dress for Steampunk or theatrical purposes!

I’m notorious for not following pattern directions, but for this dress, I decided to limit myself to no more than five pattern alterations (aside from those needed for fit):
1. Front Opening – The original dress pattern is made to zip up the back. To make the dress more historically accurate (and so I wouldn’t have mess with sewing in a zipper), I opted to make the bodice close in front with hooks and eyes.
2. Separate Skirt – Unlike Simplicity 3723’s dress, bustle-era dresses usually didn’t have the skirt attached to the bodice.
3. Bustle Shaping – In order for the dress to sit smoothly over a bustle without the hem of the skirt hiking up in the back, the back of the skirt needs to be longer and rounded.
4. Add Skirt Gores (or would they be darts of sorts?)- To keep the large amount of fabric in the skirt from bulking up the waist, bustle-era skirts generally had triangular gores cut out of the top so there was less fabric to pleat or gather.
5. Bustle “Overskirt” – To emphasize that luscious booty!
Step 1: The Pattern

Making a bustle dress out of Simplicity 3723 only takes 8 pattern pieces. Measure yourself wearing your undergarments of choice (especially if you plan to wear a corset) and choose the closest pattern size to your measurements. I recommend choosing a pattern size according to your bust measure, but generally speaking, this pattern is pretty true to size with a good amount of ease (2.5 inches in the bust) built in for the average, active wearer. As I painfully reiterated earlier, I needed to make a few additional alterations to make the pattern fit. I like to use the basic “Pattern Alterations Guide C-228” published online by New Mexico State University, but many other similar pattern altering guides are available online and in sewing books. Since the bodice pattern is so simple, it’s very easy to manipulate even if you’ve never done pattern alterations before.
You’ll notice all the pattern pieces I used were from “View A,” the prairie-style dress. The other two pieces are the “apron tie end” that I used as a waistband pattern and the “drape” pattern from the “Colonial-style” dress which would become the bustle overskirt.
Step 2: Layout
This is where most of the magic happens–and the key to making those all-important changes that will turn this into a bustle dress.

Something like this, depending on your fabric.
Once I had all my pattern pieces in order, I needed to lay them out on the fabric. Since I wanted my bodice to be front-opening, I didn’t lay the bodice front on the fold as instructed (though you still can; you’ll just need to cut it apart at the fold afterwards). To make the collar open in the front as well, I simply put the center back on the fold instead of the center front. A bodice looks much better when it is lined, so I cut the exact same pieces out of a nice old cotton sheet!
The most complex change, though, was the skirt:

In order to get that bump at the back that would make the dress curve over the bustle without the hem hanging funny, you have to have a curve at the back. Piece 5 is actually the front skirt piece, but it has that lovely curve already built in. I used it for the back of the skirt instead!
What I did:
First, I flipped piece 5 so it was on the selvage instead of the fold, then I extended the curve out until it met the fold.
Piece 5 is shorter than piece 6, so you have to extend the bottom of the piece to match the hemline.
Piece number 6 is going to be the front of your skirt. I only cut one copy of 6 because I didn’t want too much fullness at the front.
I cut a 12 inch long triangular gore out of the center waistline of piece number 6. I made mine about 5 inches wide at the top, but how wide you make yours depends on your waist size and how full you want the front of your skirt. Smaller sizes will need larger gores, otherwise there will be too much fabric at the waistline to gather/pleat down to the proper size!
I used piece 16 as a guide to cut a waistband for my skirt. I cut it 2 inches longer than my waist size to allow for finishing and overlap for the closure.
I decided to leave my skirt unlined because my fabric was fairly heavy. However, most skirts from the period are lined and lighter fabrics definitely benefit from a lining!
I chose to make the collar and drape out of a contrasting (and very annoying) green velour contrast fabric. I only cut one drape. It doesn’t look that impressive when it’s flat, but when you sew it together, it’s amazing how much fullness it has!
Step 3: Assembly

The draped overskirt is attached to the bodice. It’s not period, but it makes getting dressed a cinch!
Sew the bodice according to the envelope, but close the back seam instead of leaving it open for the zipper and leave the front seam open to add your hooks and eyes/invisible zipper/buttons. I attached the velour drape around the back, using the front darts as my stopping points. Sadly and rather embarrassingly, I ran out of hooks and eyes, so I couldn’t close the bodice all the way to the point! Whoops! Let’s just say it’s an artistic design element, shall we?

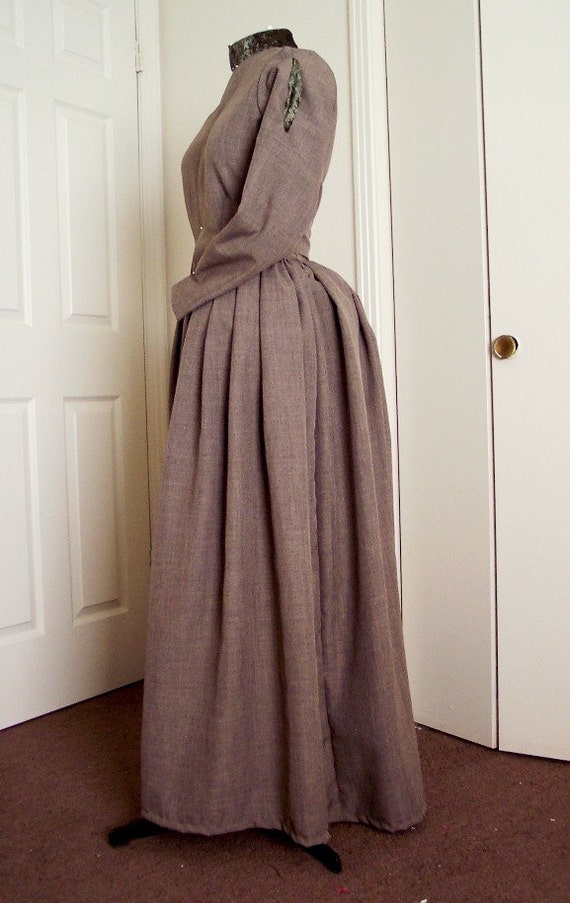
I’m 5 feet 5 inches tall (41 inches waist-to-floor) and I didn’t alter the pattern’s skirt length. In 2 inch heels, it hits just above my toes in the front.
The skirt I pleated instead of gathered because 1) pleating was the preferred method of fabric control in the 1880s, 2) it isn’t as bulky as gathering, and 3) pleating is just easier for me. In order to get a bustle skirt and not just a plain trained skirt, you actually attach the curved side of the back skirt panel to the waistline instead of the straight side. It makes a little “pooch” for the bustle to fit under and keeps the hemline even. Often, heavy skirts with lots of fabric in them have a tendency to collapse around your legs at the hem, tripping you up and generally looking a mess. The Victorians loved full skirts, so to combat hem collapse, they faced their hems–sometimes up to 12 inches deep! I didn’t go nearly that far. Instead, I just used some 48mm Wright’s bias tape hem facing. It’s stiff, easy to sew, and bends nicely around the curve of the skirt. I wish I’d found some black or even green hem tape, but all Walmart had was white. Still, it does it’s job admirably!

Step 4: Decorate!
Bustle dresses usually have tons of trims, so feel free to go nuts decorating. When in doubt, add more trim! My finished dress looked very much like a uniform– camouflage colored, square shouldered, and stark– so I decided to keep it that way. Plus, I’m broke, so lots of fancy buttons, passementerie, and the like were pretty much out of my reach. I had a swathe of green velour left from making the drape, so I cut some strips from it for decoration. Normally, I would sew the trim on, but since this velour stuff is a knit, it was hell to sew. In a moment of frustration, I broke out…THE HEATBOND.

This stuff is super vintage, too. It’s probably only a few years younger than I am!
It worked surprisingly well.The velour didn’t stretch and shed and it kept the crisp lines. It’s not as neat and tidy and sewing it on, but if you’re pressed for time or patience, the stuff can work miracles.

To get the velour tabs on the shoulders just right, I ironed them on while the dress was on the dressform. That way, I didn’t create any weird creases and I could fiddle with the positioning.
The Finished Dress:
(and some poor-quality photos)


A silly pin-up picture showing my insufficient hooks and eyes and the giant feathery poof on my impromptu 1940s-hat-turned-bonnet. What a tart!
For undergarments, I wore my swanky new corset from Hourglass Attire, a cotton tank top, a white hippie skirt, and my homemade bustle:

The bustle is just a stuffed fabric crescent that I drafted from, of all things, the sleeve head:


Then, I added ties and a circular, ruffled tablecloth I found at the thrift shop, creating an utterly ridiculous, yet surprisingly effective, bustle in just the right size:

Cost Breakdown:

Dress and bustle:
5 yards polyester “suiting” – $15, Walmart
2 yards obnoxious green velour – $6, Walmart
Queen-sized cotton sheet – $1.99, thrift shop
Heatbond – FREE! (Thank you, Reva!)
(Not enough) hooks and eyes – $1.69, Hobby Lobby
Brown poly-cotton thread – $1.98, Walmart
Ruffled cotton tablecloth – $1.99, thrift shop
Total: $28.65
While it’s certainly not re-enactment worthy or particularly flashy, it’s easy to wear, fun to make, and I didn’t have to buy any new patterns. So, I’d say the Simplicity 3723 Bustle Dress experiment was successful!
More dresses in my Simplicity 3723 series:

18th Century “Lady’s Maid” Dress

1840s Jane Eyre/ Mrs. Bates Dress

Excellent, my fellow “Broke Costumer” Love the way you manipulated the pattern. I have that one too! Will have to give it a try!
Cindy, the broke costumer :)
You are always so inventive, and in spite of what you say, your dress looks great. I’m currently fixated on a different time period, but I have “borrowed” some of your techniques for garments. And even to solve some current day fashion delimas. I especially love your willingness to try, no holding back, admitting to sewing blunders, but moving forward. You seem to be fearless with patterns and fabric, no “sacred cows”, no taboos, nothing ventured-nothing gained attitude. Girl, you inspire me.
Aw, now I’m blushing! It’s wonderful to know someone gets something positive out of my crazy crafting. :)
I am the German lady :) and I am still waiting for mine to arrive. I cant wait though, now that I see how lovely it looks on you I am very excited to finish it!
I hope your friend can get it to you soon! I didn’t add hem tape to the first one, so you might try adding some. It works miracles!
definitely will! i have problem getting the skirts caught between my legs with other skirts, so i will try it there too
That looks fab…I think I need to get that pattern. I find the same with s&s regency dress pattern I can make any empire line gown from it now.
It kinda reminds me of the dress ‘jenny’ wears in the doctor who episode the crimson horror.
That ‘One Pattern’ poem at the beginning, I nearly fell out of my chair. Never change.
I LOVE your style of clothing and that you like to make classic, historical pieces. Glad to see that someone out there in this ultra modern world enjoys old fashioned clothing like Steam punk,Victorian or styles from the 40s,50s and 60s. Do you like Gothic Victorian clothing?
Gothic Victorian was one of the genres that first got me into historical costuming. It appeals to my still-angsty self even after all these years! :) I love the tragic beauty, harsh metals mixed with soft lace, and the macabre elements that let you mix fantasy and history.
My pet costume pattern is McCall’s M4548, which can be turned into a not-totally-embarrassing 19th century everyday dress if you’re willing to do a reasonable amount of tweaking (add a bodice lining, add piping drop shoulder seams if you’re going for a midcentury look, etc.).
I have like a dozen dresses planned for this pattern, and I’ll wear them all without shame.
That’s exactly what I do with Simplicity 3723! Both patterns are basic enough that they make excellent slopers.
It’s many years later, we are in a quarantine, and I have literally sewed everything I could think of and found this. Thank you! Thank you!!! It’s been fun so far. I’d like to re-enact a photo I found of a distant relative once finished. I am literally torn between making it all black (like the relative) and adding a bunch of funky color. May add the bustle in velcro (I know I know…cringe) so I can change the colors for stage-wear. I am a drama teacher so versatility is key.I like to re-use my costumes as many times as possible.
I love it! Do it! Also, you could make the bustle puffs tie on like an apron instead of attaching it to the back of the bodice
Thank you!! I think I will do that. I can’t seem to get a great drape like your green velour so I will sew in an English bustle at the end and give it ties. I am finished with the bodice. It’s gorgeous!!! I altered the pattern in the waist. I am so glad I did!! And now I learned a new skill. I have never been blessed with a tiny waist so knowing how to add a few inches at the waist to the Big 3 patterns is amazing!!! Tonight I am starting the bustle, and then will finish the skirt. I am a little nervous about the pleats and the gore. But hey, It’s going to be covered by the bustle so…. Did you zip your skirt or add buttons? I will post when it is finished. :). I looked up a similar dress on Etsy and it was $440 so I feel very happy to have her for around $65. I know it’s not period but I watched a video of a woman showing how to get dressed in accurate period and I almost fainted. Too many layers!!! I live in Florida. No chance. I made my husband promise to take me to dinner at this Steampunk restaurant when things open again in the Fall (no way to wear something like this in the summer here). I wish we had a cool group of people here that liked to do museum crawls and outings like your family and friends!! I’m sorry you missed your tea. I know how hard we work on these things. We do go to Carnevale in Italy every year so my husband and I really look forward to wearing our costumes then. Love your work. Thanks again for the inspiration.
Oh I’ve been meaning to ask you… what do you do with all of your costumes? You must have quite a collection by now. :)
Many of them I no longer fit into, so I donate them to local high school theater classes or thrive them to friends.
The local theaters must be ecstatic to have them!!
Hi Liz, it’s 6 years on to the month from when you published this and I’m quite thrilled to read it. I have this pattern and 2 years ago started a dress, well, muslin mock-up really – but I was fascinated that we had several similar thoughts – bodice opening in front, switch the collar around, detach the bodice, use thrift store sheets…it was so great to see that a “real” sewer had the same ideas! And seeing how you translated those is wonderful. My pattern was not in my size so I was modifying that as well. My bodice mock up was pretty amazing (for me), but life got in the way and I never finished. Now I’m ready to tackle it again and found this post as part of my research – so many thanks for this article, it really means a lot to me to read your experiences and advice. Best to you!
Six years?! Holy cow, you’re right! It feels like an eon and yet only yesterday. Simplicity 3723 is still one of my favorite patterns. I am happy to hear you’re picking yours back up again! When you are done, pop over to my Facebook and send me a picture. I always like to see what folks make. 🙂
I’m embarking on making a costume for my grand daughter for Halloween – from “Back to the Future 3” Clara’s “purple dress”. My daughter picked out this pattern and I was so tickled to see that you had been able to turn it into a bustle dress. I’d had similar thoughts to yours and happy to find I’m on the right track! We’ll see how it goes! Thanks for sharing your adventure.
Clara is a great character to dress up as for Halloween! Happy costuming!