
Big Hair was a Big Deal Long Before Dallas and Dolly Parton!
Those of you that browse my rambling frequently are well aware that I am hair illiterate. Indeed, I know next to nothing about taming my crispy, unruly mane. Yet, I am slowly teaching myself a few tricks here and there, and the internet has been a boon for my boring locks.
As a strong adherent to the old cliche that “every curly-haired girl wants straight hair and every straight-haired girl wants curls,” I have dreamed of lovely curls since childhood. When I was very young, my mother had tightly permed 1980s poodle hair (her words, not mine!), and I remember playing with her pink plastic hair pick, pretending I had a perm that needed fluffing, too. I am infinitely envious of those glamorous 1980s superstars like Bernadette Peters and Whitney Houston who had curls so luscious no scrunchie could contain them! A perm is still on my wish list (even though everyone who survived the 80s or who has naturally curly hair tries their best to talk me out of it).


Besides wanting crazy amounts of day-to-day curls, my historical costuming adventures have reenforced just how important curls have been throughout the ages. The 1980s do not hold the monopoly on excessive amounts of curl! Indeed, many eras require spiral curls to achieve the right look:
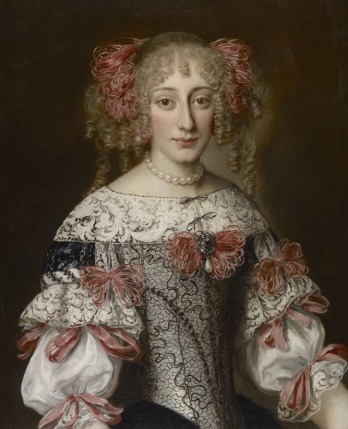
An Unknown Nobelwoman painted by the wonderful Jacob Ferdinand Voet modelling a 1670s hairstyle.

This lovely Portrait of a Lady by François Henri Mulard displays the shorter spiral curls popular during the Regency era.

This mid-19th century teenage girl has possibly the most enviable set of sausage curls in the history of mankind! I found her photo (and the one below) while I was researching Victorian haircare and have been obsessed ever since!

This unknown beauty from the 1870s perfectly demonstrates the decade’s fashion for intricately curled and mounded hair.
Other eras benefit from the volume brushed-out curls can give, especially late 18th century and early 20th century hairstyles:

Georgiana, Duchess of Devonshire, late 18th century, demonstrating the infamous “hedgehog” hairstyle.

Miss Carlyle and Miss Clarke enjoy tea Gibson Girl style while attempting to balance the hair piled fashionably high on their foreheads.
Many of these looks were achieved through wigs and hair extensions. Buying and selling human hair has been big business for centuries and one of the greatest criticisms of hair fashions was the fact that many styles often meant that the majority of the hair on a woman’s head was not her own, but that of a complete stranger! Much of the hair used to make switches and wigs came from peasant girls in rural areas, so a princess might literally have the hair of a pauper.
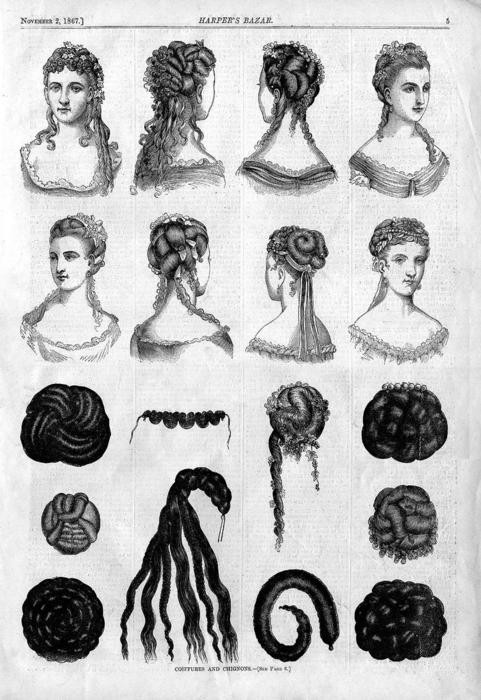
Fancy hairstyles and the hair switches required to complete them, circa 1867
Unless you are lucky enough to be gifted by nature with thick, voluminous locks, hairpieces, rats, rolls, and wigs are all part of a modern historical costumer’s hair arsenal. There are plenty of awesome tutorials with tricks to boost the volume of your natural hair with socks and hair rats or make yourself a completely new hairdo using a wig. Jen of Festive Attyre always has beautiful big Georgian hair thanks to a combination of curling her own hair and adding in a hairpiece:
I can barely handle my own hair, so rats and hairpieces escape me and wigs are a whole ‘nother beast entirely. I do have a squishy net doughnut that I use to help me make buns, but otherwise, I have very few hair-boosting tools (indeed, I didn’t have a hairdryer until my sister bought me one for my birthday this year). My go-to to get the volume I crave has long been braiding. I used a single braid to get fluffy 1890s “New Woman” hair:

How to Get No-Fuss Fluff for the New Woman
I have been known to wander around the apartment complex looking like this:

To get to 1890s/1980s worthy fluff, you must first re-live the 1990s.
If I braid my whole head like this, I am rewarded with glorious poofy hair that looks like it was crimped:

Enjoying the irony as Mother Nature wearing faux foliage in the middle of a Taco Bell.
However, it’s not curls. I’d attempted pin curls a few times over the years, but I never got them to work satisfactorily, so for Georgian Picnic this year, I decided to try something new. I had been stumbling around Pinterest as one is wont to do at 3am when I started seeing all these pins about straw curlers and the photos made my jaw drop:

AAAAAAAAAAAAAA! SO GORGEOUS!
Most the the tutorials I found were for African American hair and I worried that my pale, limp locks wouldn’t be able to support the curls thanks to their lack of texture, but I decided to try it anyway. Anything for those spirals!
I found this tutorial and when I saw the curls she got at 6:06, I freaked out!
CURLS! SAUSAGE CURLS! JUST LIKE 1860s GIRL’S SAUSAGE CURLS!
I think I would have fallen out of the chair if there wasn’t a cat in my lap digging her claws into my thigh for dear life. The day before Georgian Picnic, I bought a cheap pack of 100 straws for about $1.50 at Walmart and commenced experimenting. I was aiming for a hairstyle like this:

Portrait of Jane Horley by Rolinda Sharples, circa 1815-20
So I separated the front half of my hair and curled it, leaving the back uncurled (I put it up in a bun). I didn’t use any products in my hair before, during, or after. I did have slightly damp hair when I began.

My hair in its natural state.

I bent the straws and held them in place with bobbie pins, murdering quite a few in the process. Long metal hair clips would probably work better. You might even have some and not know it! Check your sewing kit. Fabric clips and hair clips are quite similar.
I will admit that I had a little trouble rolling the hair onto the straws. Most of that just springs from my inability to roll hair (hence why curlers, pin curls, and any other type of curl had thus far been unattainable). I rolled my hair over itself instead of all along the straw like in the video. This worked for my purposes in the end, however, because Regency curls are short anyway.
I slept on my straw-filled hair, but as I would later find out, the straws work their magic in only a few hours. When I took out all the straws, this is what I ended up with:

My hair is much longer in front than a Regency woman’s would have been, so my curls hang lower than most portraits show.

After phutzing with the ringlets a bit.
This is the hair I attended Georgian Picnic with. Since it was my first attempt, it was a bit messy, but it did suit the romantic aura of the era pretty well.

Photo courtesy of Festive Attyre
When I got home, I separated the ringlets with my fingers just to see what they looked like looser and I was rewarded with light, fluffy, fairly natural-looking curls:

I lost about 1/2 of my hair’s length to the curls, mostly due to the way I wrapped them around the straws. If you wrap the hair more evenly over the straws, you won’t lose as much length.
The curls had good volume and made a nice Gibson Girl pouf pretty easy. I wish I’d taken a photo! Since I’d gone this far, might as well go the extra mile and brush everything out!

Helloooooooooo giant hair of my dreams!
I’m only a few hairpins, some hair powder, and one fabulous hat away from this:
Portrait of Catherine Clemens by George Romney, circa 1788
I am so excited to have finally found a curling method that works for my hair! The curls held well until I had to wash my hair the next day, so they are perfect for long events. They survived wind, rain, and my hat in great condition. I tried them a second time for my dress photoshoot and only left the straws in my hair for about two hours. The final curls were a bit looser, but still held up to outdoor photography. Plus, I’d gotten a bit better at winding the hair around the straws, so the results were much smoother:

I also did fewer curls to save time and ended up liking the look much better.
So my straw curler experiment was a complete success! There are skinny wired-foam curlers that work similarly, but I never got them to work as well as these good ol’ Wally World drinking straws– a cheap and effective solution!

We used to do the same for dressing for Sunday or party best but with long strips of cloth usually torn from an old sheet that are at least twice as long as your hair. Part your damp hair, pin or hold a strip at the top then wrap hank of hair around the rag until all hair in that length is wrapped, then fold up the unused length of rag wrapping that around the hair already wound and then tie the ends of the rag together at the top of the head. Keep adding wrapped lengths until all the hair is done. Then sleep overnight with a lumpy head and style/brush out in the morning. My sister and I had very fine straight hair and it was about the only way of getting some volume or shape to it. This was 1960’s and probably a very old fashioned hair styling choice even for those days.
That mid-19th century teenage girl, who has possibly the most enviable set of sausage curls in the history of mankin, sure looks happy about it!!! :(
Wow! Those straws made your hair look fantastic!!! Your new curly locks really set off your costumes. So well done!
Excellent! Had no idea I could use up those Ikea straws this way… And get curls with a tool that might not have to be cut from my already unruly hair. The end result is wonderful, and very convincing.
These are wonderful! Your hair looks great. I would say there is nothing wrong with using a bit of hair gel by running it through your slightly damp hair before curling on the straws, as setting gels have existed for a very long time. The gel in small amounts will make your curls bullet-proof if you need to keep them for 2 days (just have to skip the day-two wash, which isn’t too bad if you have most of your hair up the whole time).
When I need my 1890s “lunatic fringe” bangs for my first-person programs, I use a dab of gel and curl with a tiny-barrel (1/2″) curling iron in the same manner I did in high school in the 1980s. My hair is almost exactly the same texture as you describe yours, and as your photos confirm. My curling iron cost about $9 and came from Sally Beauty supply. They are my go-to for hairnets, a basic bun-sized switch (to make my bun appear double the size, as it is so fine that even with a length halfway down my back my own hair makes a very small bun), and old-school hairpins that twist as opposed to bobby pins. Sally has a discount program, too.
Keep up the excellent work, Liz! Your tutorials are such a help to me and I’m sure all of your readers. May I reblog?
I think I want to try the straw method to see what it does with my bangs now that they are growing out (I’m switching to late 1890s, when the lunatic fringe falls out of fashion). I might have a little fun with Regency hair while I can.
Reblog away! We have a tiny Sally’s here where I got my foam “noodle” curlers. I want a really tiny 1/4 inch electric curling iron to take care of the straight bits that escape from my curlers.
Wowie!!! I managed something similar using tiny perm rods, but never slept on them, as they were too knobby. Or foam rollers. In the old days 1960s we used stale beer as a setting lotion. Works great!
Terrific post,
Nancy N
Reblogged this on Just As I Am…Meet Laura Ingalls Wilder and commented:
One of my favorite bloggers, Liz, at The Pragmatic Costumer, has posted another fabulous installment about historic hairstyles. This time, the subject is all manner of curls:
I’ll have to try this or the rag method sometime! My hair’s pretty coarse and thick and does not respond well at all to hot curling – it goes straight and frizzy instead.
OMG that’s brilliant!!! I had such massive curl envy at the picnic. My curls (with an iron) were a complete disaster that day, so I sat there coveting your ringlets like mad all afternoon. Thanks for sharing your secrets! I can’t wait to try this one out!
You’ve done did it again: mixing common sense with frugality to produce success. Not to mention entertaining us throughout. Well done and looking forward to trying it out at some point.
Very best, Natalie in KY
P.S. Hair rats really are dead simple: stuff your own hair, or wool fiber, or even old shredded stockings into a hair net and wrap it up into a cushion or tube. If you wrap well you don’t even have to sew it shut. Part your hair from side to side where you want to place it, pin it in with bobby pins, arrange your hair over the top and pin that, and pouf, you have pouf where you want it.
your hair turned out so great!
I must try this! my hair is nearly impossible to curl but this looks promising!
oh and a suggestion on the bobby pins, the “meta grip premium bob pins” are awesome. they cost more but they last a whole lot longer, which make them totally worth it. especially if you use bobby pins alot.
Oh, you have given me hope for curls! I went searching for the unknown noblewoman and think this may be her:
http://www.gogmsite.net/casual_dress_-_1641_to_1683/1679-unknown-noblewoman-by.html
Thank you for finding her again! Many of my older posts are starting to show up with broken images, so I appreciate the help finding them!
dippity do and brush rollers with picks every saturday night as kids. We begged mom to try ‘rag’ rollers, but she finally compromised with the pink foam, as long as we had brushed 100 strokes EVERY NIGHT that week! Ah, childhood.
You curls look great.